들어가는 말
사용자들이 게시물을 작성할 때 이전과 다르게 기본 에디터를 제공하여 편의성을 제공합니다. 연동할 수 있는 에디터가 많이 있습니다. 그 중에 CKEditor 를 이용하여 이미지 파일 업로드 적용 방법과 기본적인 설정 몇 가지를 변경하는 방법을 알아보고자 합니다.
CKEditor 연동
기본적인 연동은 간단합니다. http://ckeditor.com 사이트에 방문하여 Download 페이지로 이동하면 용도에 따라 다운로드 받을 수 있도록 준비되어 있습니다. 본인에게 맞는 패키지를 선택하여 다운로드 하면 됩니다. 필자는 Full Package를 받았습니다.
다운로드 후 압축파일을 풀고 프로젝트 폴더의 적당한 곳에 복사를 합니다. 그 다음 연동하고자 하는 페이지에 다음과 같이 추가해 줍니다.
<script type="text/javascript" src="../ckeditor/ckeditor.js"></script>

<div class="form-group">
 <label for="noticeContent">내용</label>
 <textarea class="form-control" name="noticeContent" id="noticeContent" cols="50" rows="15"></textarea>
 <script>
 CKEDITOR.replace('noticeContent');
 </script>
</div>
CKEditor 이미지 파일 업로드 적용 활성화
Toolbar에 이미지를 추가할 수 있는 버튼을 클릭해보면 대화상자가 나타나는데 아무리 찾아보아도 이미지를 올릴 수 있는 방법이 없습니다. 기본적으로 비활성화 되어 있는 상태라서 그렇습니다. 에디터 폴더에 있는 config.js 파일에 다음과 같이 추가합니다.
config.filebrowserUploadUrl = '업로드 된 파일을 처리할 프로그램 경로(ex:/ckeditor/fileUpload.aspx');
새로 고침을 한 후 이미지 버튼을 클릭해 보면 다음과 같이 업로드 탭이 나타납니다.
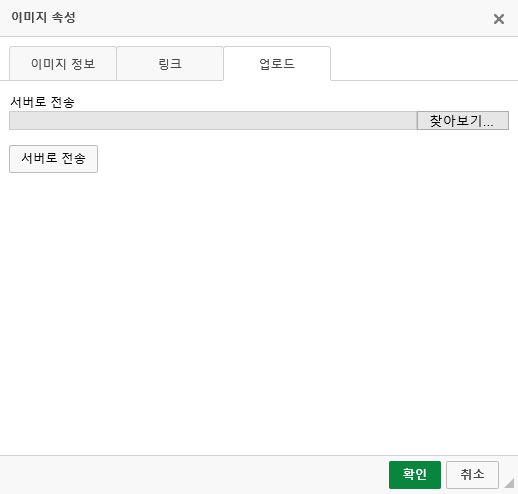
업로드 탭이 추가된 대화상자
이미지 파일을 선택하고 서버로 전송 버튼을 클릭하면 위에서 지정한 파일업로드 프로그램을 통하여 처리됩니다. 파일업로드 부분은 본인의 상황에 맞게 구현하시면 됩니다. 간단한 예를 들어보겠습니다.
var uploadFile = HttpContext.Current.Request.Files;

var currentUploadFile = uploadFile[0];
if (currentUploadFile != null && currentUploadFile.ContentLength > 0)
{
 var uploadFileName = Path.GetFileName(currentUploadFile.FileName);

 var baseDomainAddress = "toughman.pe.kr";
 var fileUploadFolder = "d:\\www\editor_upload\\";
 var fileUploadFolderWebPath = baseDomainAddress + "/editor_upload" ;

 if (Directory.Exists(fileUploadFolder) == false)
 {
 Directory.CreateDirectory(fileUploadFolder);
 }

 var fileUploadAllowExtension = "jpg,png,jpeg";

 var uniqueFileNameFullPath = GetUniqueFileName(fileUploadFolder, uploadFileName);

 var fileExtension = uniqueFileNameFullPath.Substring(uniqueFileNameFullPath.LastIndexOf(".") + 1).ToLower();

 var allowFileExtension = fileUploadAllowExtension.Split(',');

 if (allowFileExtension.Contains(fileExtension) == true)
 {
 currentUploadFile.SaveAs(uniqueFileNameFullPath);
 var webPath = fileUploadFolderWebPath + Path.GetFileName(uniqueFileNameFullPath);

 Response.Write("<script type='text/javascript'>\nwindow.parent.CKEDITOR.tools.callFunction(1, '" + webPath + "', '');\n</script>");
 }
 else
 {
 Response.Write("<script type='text/javascript'>\nalert('허용되지 않은 파일 유형입니다.');\n</script>");
 }
}
다른 부분의 처리는 다를 수 있지만 30행은 업로드된 이미지를 에디터에 나타나도록 하는 코드 입니다. 이것이 없으면 업로드는 되지만 이미지가 에디터에 나타나지 않습니다.
Toolbar 설정
Full Package를 연동해 보면 Toolbar 항목이 많습니다. 대부분 모든 기능을 제공할 필요는 없고 최소한의 기능만 제공해 주면 됩니다. Toolbar 항목을 원하는 대로 편집할 수 있습니다. 모든 항목에 대한 정확한 정보를 알기아 어려우므로 Toolbar Configurator를 사용하면 됩니다. 주소는 다음과 같습니다.
http://ckeditor.com/latest/samples/toolbarconfigurator/index.html#basic
페이지에 접속해 보면 Ckeditor Toolbar 가 있고 아래에 체크박스를 토글해 보면 Toolbar 항목이 같이 토글됨을 알 수 있습니다. 상단에 Basic, Advanced 선택 버튼이 있는데 필자는 Advanced 로 변경해 놓고 편집하였습니다. 그 다음 그 내용을 config.js 파일에 다음과 같이 추가하였습니다.
CKEDITOR.editorConfig = function( config ) {

	config.toolbar = [
			{ name: 'clipboard', items: ['Cut', 'Copy', 'Paste', 'PasteText', 'PasteFromWord', '-', 'Undo', 'Redo'] },
			{ name: 'insert', items: ['Image', 'Table', 'HorizontalRule', 'SpecialChar', 'PageBreak'] },
			'-',
			{ name: 'basicstyles', items: ['Bold', 'Italic', 'Underline', 'Strike', 'Subscript', 'Superscript', '-', 'CopyFormatting', 'RemoveFormat'] },
			{ name: 'paragraph', items: ['NumberedList', 'BulletedList', '-', 'Outdent', 'Indent', '-', 'Blockquote', 'CreateDiv', '-', 'JustifyLeft', 'JustifyCenter', 'JustifyRight', 'JustifyBlock'] },
			{ name: 'links', items: ['Link', 'Unlink'] },
			'/',
			{ name: 'styles', items: ['Styles', 'Format', 'Font', 'FontSize'] },
			{ name: 'colors', items: ['TextColor', 'BGColor'] },
	];

};
이런 방식으로 필요한 기능만 제공할 수 있습니다.
Bootstrap Modal 과 충돌
프로젝트 특성상 일관성 유지를 위하여 에디터 기능을 Bootstrap Modal에 포함시켜야 하는 경우가 있습니다. 에디터 자체는 나타나는데 스타일, 문단, 글꼴 등을 선택할 수 없는 문제가 있습니다.
Bootstrap Modal안에 연동
선택할 수 있도록 변경을 해야 하는데 이미 같은 문제를 겪은 프로그래머가 패치를 만들었습니다. 필자의 경우 패치를 적용해도 변화가 없어서 다른 포럼에서 참고한 조건을 추가하여 다음과 같이 적용하였습니다.
// bootstrap-ckeditor-fix.js
// hack to fix ckeditor/bootstrap compatiability bug when ckeditor appears in a bootstrap modal dialog
//
// Include this file AFTER both jQuery and bootstrap are loaded.
// http://ckeditor.com/comment/127719#comment-127719
$.fn.modal.Constructor.prototype.enforceFocus = function() {
 modal_this = this
 $(document).on('focusin.modal', function (e) {
 if (modal_this.$element[0] !== e.target && !modal_this.$element.has(e.target).length && $(e.target.parentNode).hasClass('cke_contents cke_reset')
 && !$(e.target.parentNode).hasClass('cke_dialog_ui_input_select')
 && !$(e.target.parentNode).hasClass('cke_dialog_ui_input_text')) {
 modal_this.$element.focus()
 }
 })
};
글꼴 추가
기본적으로 글꼴이 영문위주로 되어 있습니다. 한글 글꼴을 추가하려면 config.js 파일에 다음의 내용을 추가하면 됩니다.
config.font_names = CKEDITOR.config.font_names = '맑은 고딕/Malgun Gothic;굴림/Gulim;돋움/Dotum;바탕/Batang;궁서/Gungsuh;' + CKEDITOR.config.font_names;
세미콜론으로 구별하여 DropDown에 나타날 글자/폰트명 형식으로 추가하면 됩니다. 뒤쪽에 CKEDITOR.config.font_names 부분은 원래 있었던 것을 추가하는 부분입니다. 즉, 한글 글꼴이 앞쪽에 나오고 원래 설정되어 있던 것이 뒤쪽에 나타나게 됩니다.
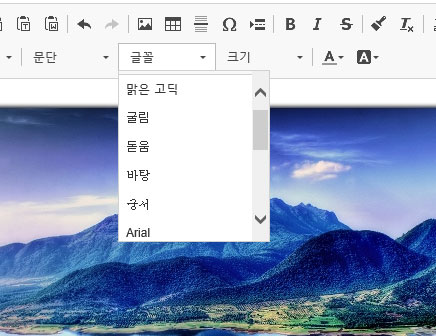
글꼴을 추가한 후 항목변화
필자의 경우 한글로 지정한 레이블이 깨져서 나왔습니다. config.js 파일의 인코딩이 [한국어 – 코드 페이지 949] 되어 있던 것이 원인 이었습니다. 이것을 비주얼 스튜디오에서 [유니코드(서명 있는 UTF-8) – 코드 페이지 65001] 로 변경하여 저장하니 한글이 제대로 나타났습니다.
Enter 키 처리
에디터에서 문장을 입력하고 엔터를 입력하면 삽입되는 태그를 선택할 수 있습니다. 처음에는 <br /> 태그가 적용되지 않아서 행간의 사이가 너무 벌어져 보였습니다. 다음과 같이 config.js 파일에 적용 후 행간이 적당하게 되었습니다.
config.enterMode = CKEDITOR.ENTER_BR;
이상으로 CKEditor 이미지 파일 업로드 적용 방법과 설정을 상황에 맞게 변경하는 부분을 알아보았습니다.
안녕하세요, ck에디터4를 적용중 이미지업로드에서 막혔는데 본 블로그 글의 “다른 부분의 처리는 다를 수 있지만 30행은 업로드된 이미지를 에디터에 나타나도록 하는 코드 입니다. 이것이 없으면 업로드는 되지만 이미지가 에디터에 나타나지 않습니다.”에서 도움을 받아 해결했습니다. 매우 감사합니다.
제 블로그에 방문해 주셔서 감사합니다!
도움이 되셨다니 기쁩니다!